Solution Pattern: Edge to Core Data Pipelines for AI/ML
See the Solution in Action
1. Demonstration
The Demo primarily focusses on showcasing how the combination of key Red Hat technologies unlocks the capability of constructing a fully automated platform that chains the full cycle of acquiring data, training models, delivering and deploying models, and run live inferencing.
The sections below will help you walk through the essentials of installing and running the demo. But there is much more to discover and extract out of it, among other things:
-
Customise AI/ML models from publicly available pre-trained models.
-
Create developer-friendly AI/ML models (easy to integrate with).
-
Apply integration technology to move discrete or bulk-based training data.
-
Bridge remote services using Service Interconnect
-
Create scalable architectures growing numbers of edge environments.
2. Recorded Video
Watch the recorded video of the solution pattern, and find below instructions on how to install the demo and run it.
3. Install the demonstration
This Camel Quarkus component combines MQTT and HTTP clients (such as IoT devices, cellphones, and third-party clients) with an AI/ML engine to obtain image detection results.
3.1. Prerequisites
You will require:
-
An OpenShift Container Platform cluster running version 4.12 or above with cluster admin access and Red Hat OpenShift AI installed.
-
Docker, Podman or Ansible installed and running.
To run the demo’s Ansible Playbook to deploy it you’ll need one of the above. If none of them is installed on your machine we suggest installing Docker using the most recent Docker version. See the Docker Engine installation documentation for further information. You’ll find more information below on how to use Podman or Ansible as alternatives to Docker.
3.2. Provision an OpenShift environment
-
Provision the following Red Hat Demo Platform (RHDP) item:
-
Solution Pattern - Edge to Core Data Pipelines for AI/ML
-
The provisioning of the RHDP card above will just prepare for you a base environment (OCP+AI). You still need to deploy the demo by running the installation process described below.
-
The provisioning process takes around 80-90 minutes to complete. You need to wait its completion before proceeding to the demo installation.
-
-
-
Alternatively, if you don’t have access to RHDP, ensure you have an OpenShift environment available and install Red Hat OpenShift AI.
You can obtain one by deploying the trial version available at Try Red Hat OpenShift.
3.3. Install the demo using Docker or Podman
|
For more installation tips and alternative options to Docker and Podman, look at the README file in the demo’s GitHub repository. |
Ensure your base OpenShift+AI environment is ready and you have all the connection and credential details with you.
-
Clone this GitHub repository:
git clone https://github.com/brunoNetId/sp-edge-to-cloud-data-pipelines-demo.git -
Change directory to the root of the project.
cd sp-edge-to-cloud-data-pipelines-demo -
Configure the
KUBECONFIGfile to use (where kube details are set after login).export KUBECONFIG=./ansible/kube-demo -
Obtain and execute your login command from OpenShift's console, or use the
occommand line below to access your cluster.oc login --username="admin" --server=https://(...):6443 --insecure-skip-tls-verify=trueReplace the
--serverurl with your own cluster API endpoint. -
Run the Playbook with Docker/Podman
-
First, read the note below
If your system is SELinux enabled, you’ll need to label the project directory to allow docker/podman to access it. Run the command:
sudo chcon -Rt svirt_sandbox_file_t $PWDThe error you may get if SELinux blocks the process would be similar to:
ERROR! the playbook: ./ansible/install.yaml could not be found
-
Then, to run with Docker:
docker run -i -t --rm --entrypoint /usr/local/bin/ansible-playbook \ -v $PWD:/runner \ -v $PWD/ansible/kube-demo:/home/runner/.kube/config \ quay.io/agnosticd/ee-multicloud:v0.0.11 \ ./ansible/install.yaml -
Or, to run With Podman:
podman run -i -t --rm --entrypoint /usr/local/bin/ansible-playbook \
-v $PWD:/runner \
-v $PWD/ansible/kube-demo:/home/runner/.kube/config \
quay.io/agnosticd/ee-multicloud:v0.0.11  \
./ansible/install.yaml
-
4. Walkthrough guide
The guide below will help you to familiarise with the main components in the demo, and how to operate it to trigger the actions…
4.1. Quick Topology Overview
Open your OpenShift console with your given admin credentials and open the Topology View to inspect the main systems deployed in the Edge1 namespace.
Following the illustration below:
-
Select from the left menu the Developer view
-
Search in the filter textbox by
edge1 -
Select the project
edge1 -
Make sure you display the Topologoy view (left menu)
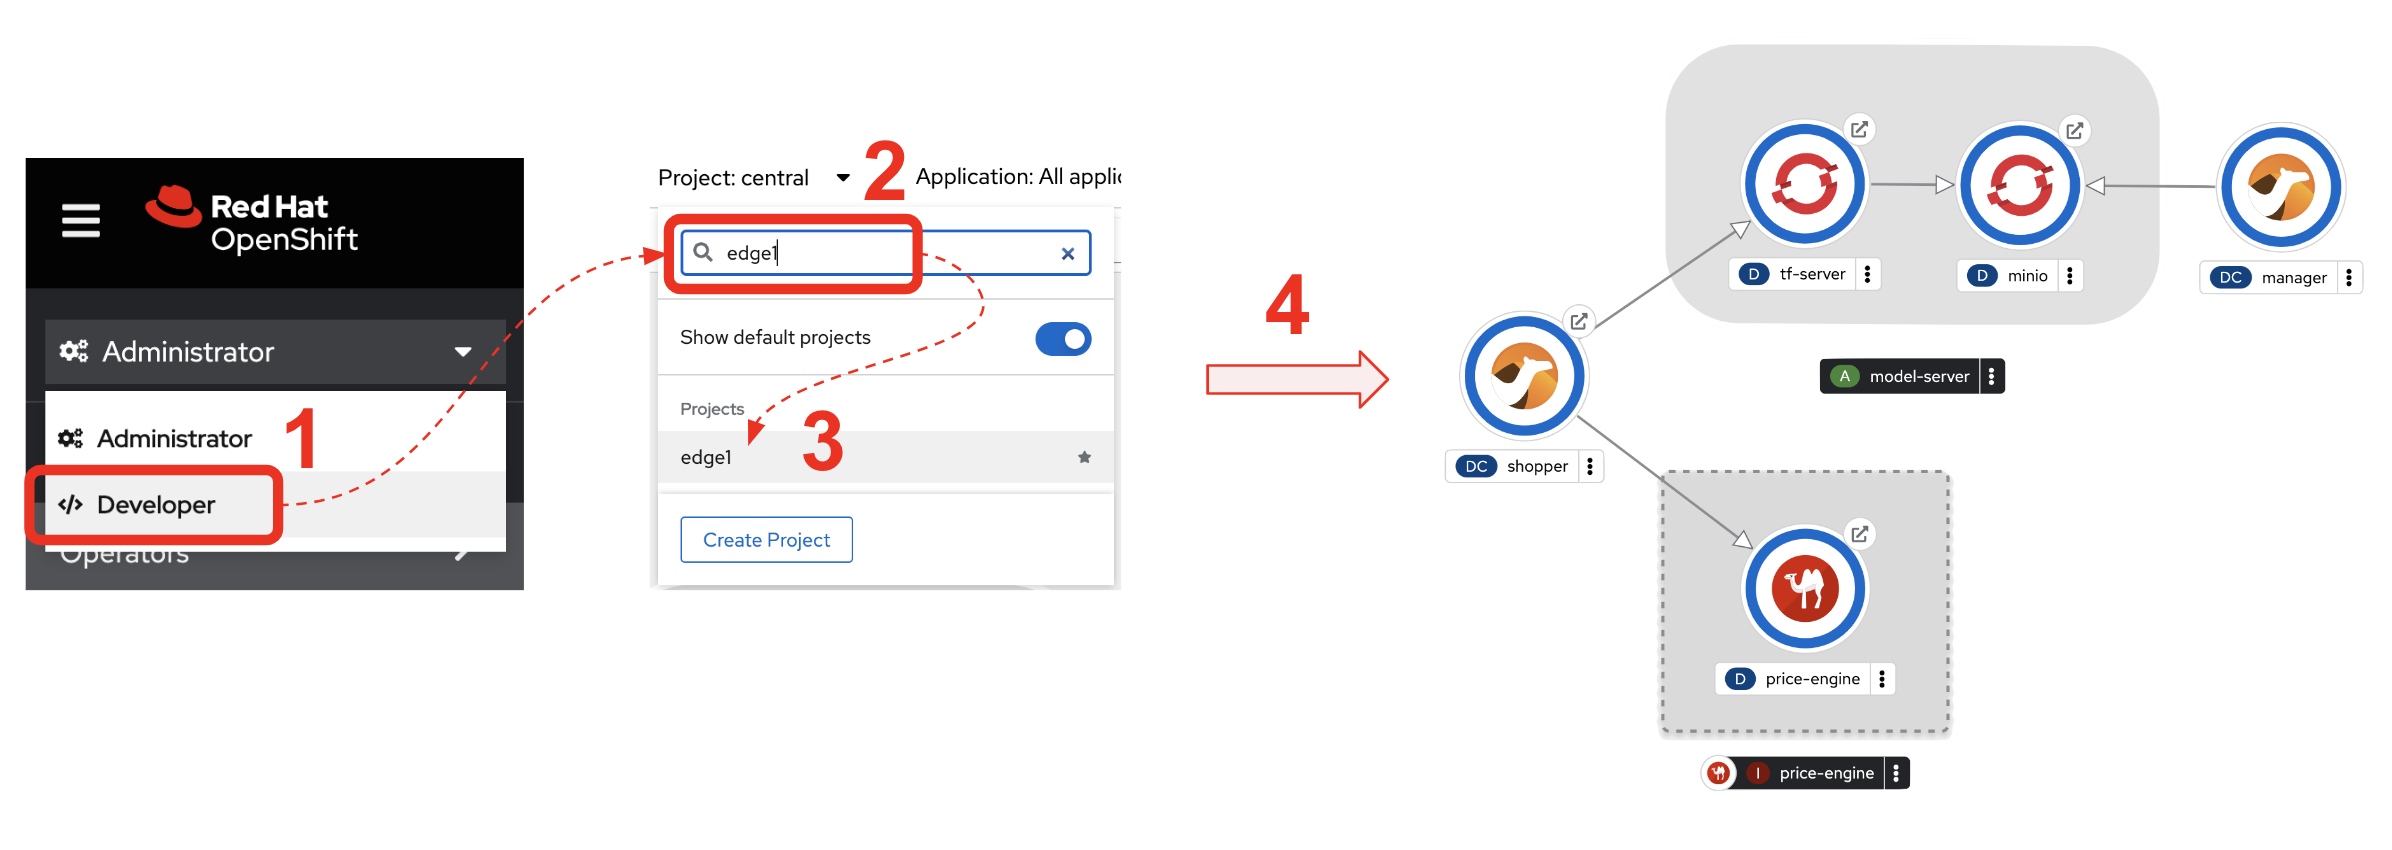
In the image above you’ll see the main applications deployed in the Edge zone:
-
Shopper: This is the main AI-powered application. The application exposes a smart device App you can open from your phone or browser. The application integrates with the AI/ML Model Server to request inferences, and also with the Price Engine to obtain price information from the product catalogue.
The App has two main uses:
-
Customers/Shoppers use it to obtain information about product, in this context of this demo, the price tag of a product.
-
Staff members can generate training data by capturing images for new products.
-
-
Model Server: This is the AI/ML engine running inferences and capable of recognizing products. It exposes an API for clients to send an image, and responds with the product name identified. The Model Server is composed of:
-
TensorFlow model server: the AI/ML brain executor.
-
Minio instance (from where the models are loaded).
-
-
Price Engine: This application keeps the product catalogue and contains the pricing information. It exposes an API to obtain product information where the price tag is included.
-
Manager: This integration runs in the background monitoring the availability of new model versions in the Core Data Centre (Central). When a new model version is available it is responsible to obtain it and push it to the Model Server.
| You’ll find in the Edge project other systems also deployed, but we won’t dive into them as they are of less importance to the main story. Some mentions will be done to them when the context is relevant. |
4.2. Play with the Smart Application
Let’s interact with the Edge environment from the Smart Application to see the system in action.
|
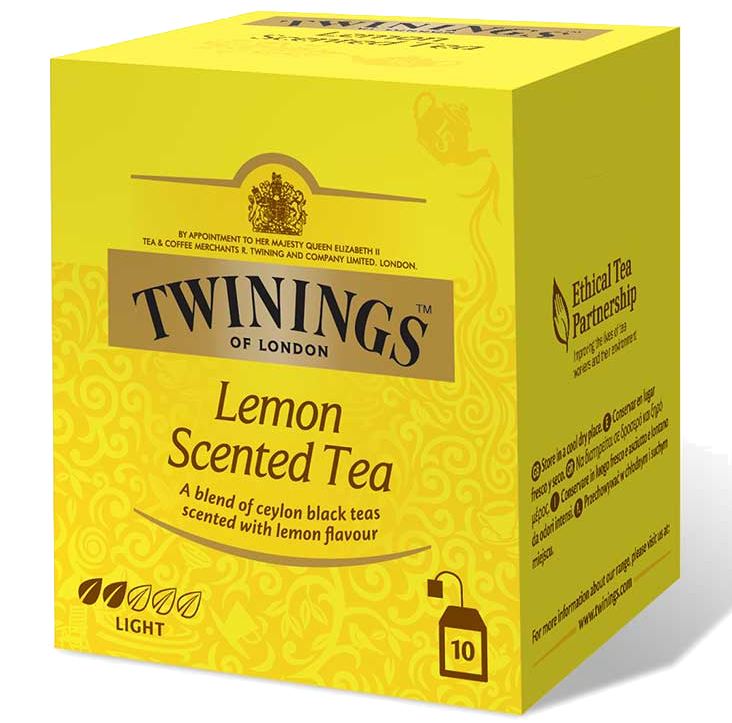
The model server has been preloaded with a first version of the model (v1), pre-trained to only recognise two types of tea: Earl Grey Tea and Lemon Tea.
|
First, let’s run some negative tests by taking random pictures of objects around you. Because v1 has not been trained to identify those objects, the system will not be able to provide a price for them and will respond with the label "Other" (as in 'product not identified').
Open the Shopper App by clicking on the Route exposed by the application pod, as shown in the picture below:
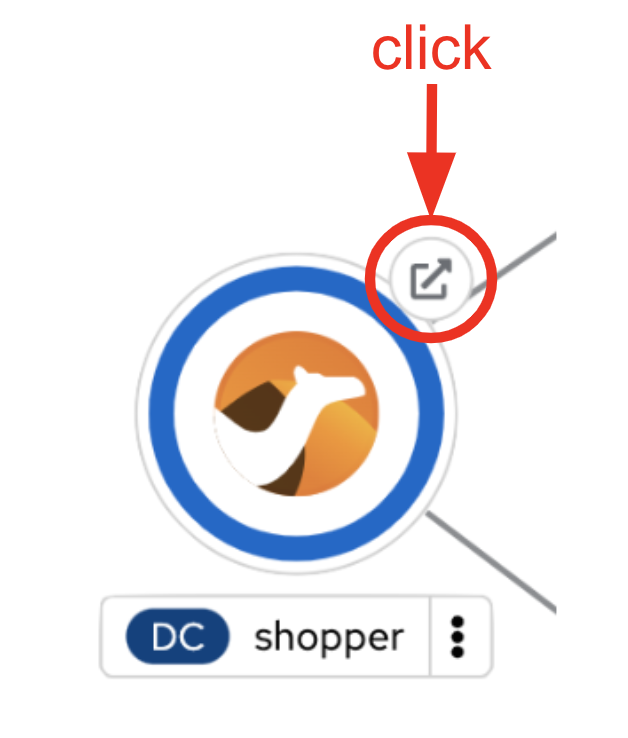
This action will open a new tab in your browser presenting the app’s landing page.
| You can also open the application from your smart phone if you share its URL to your device. |
Next, follow the actions below illustrated to run some inferences. Observe the response on your screen every time you send an image.
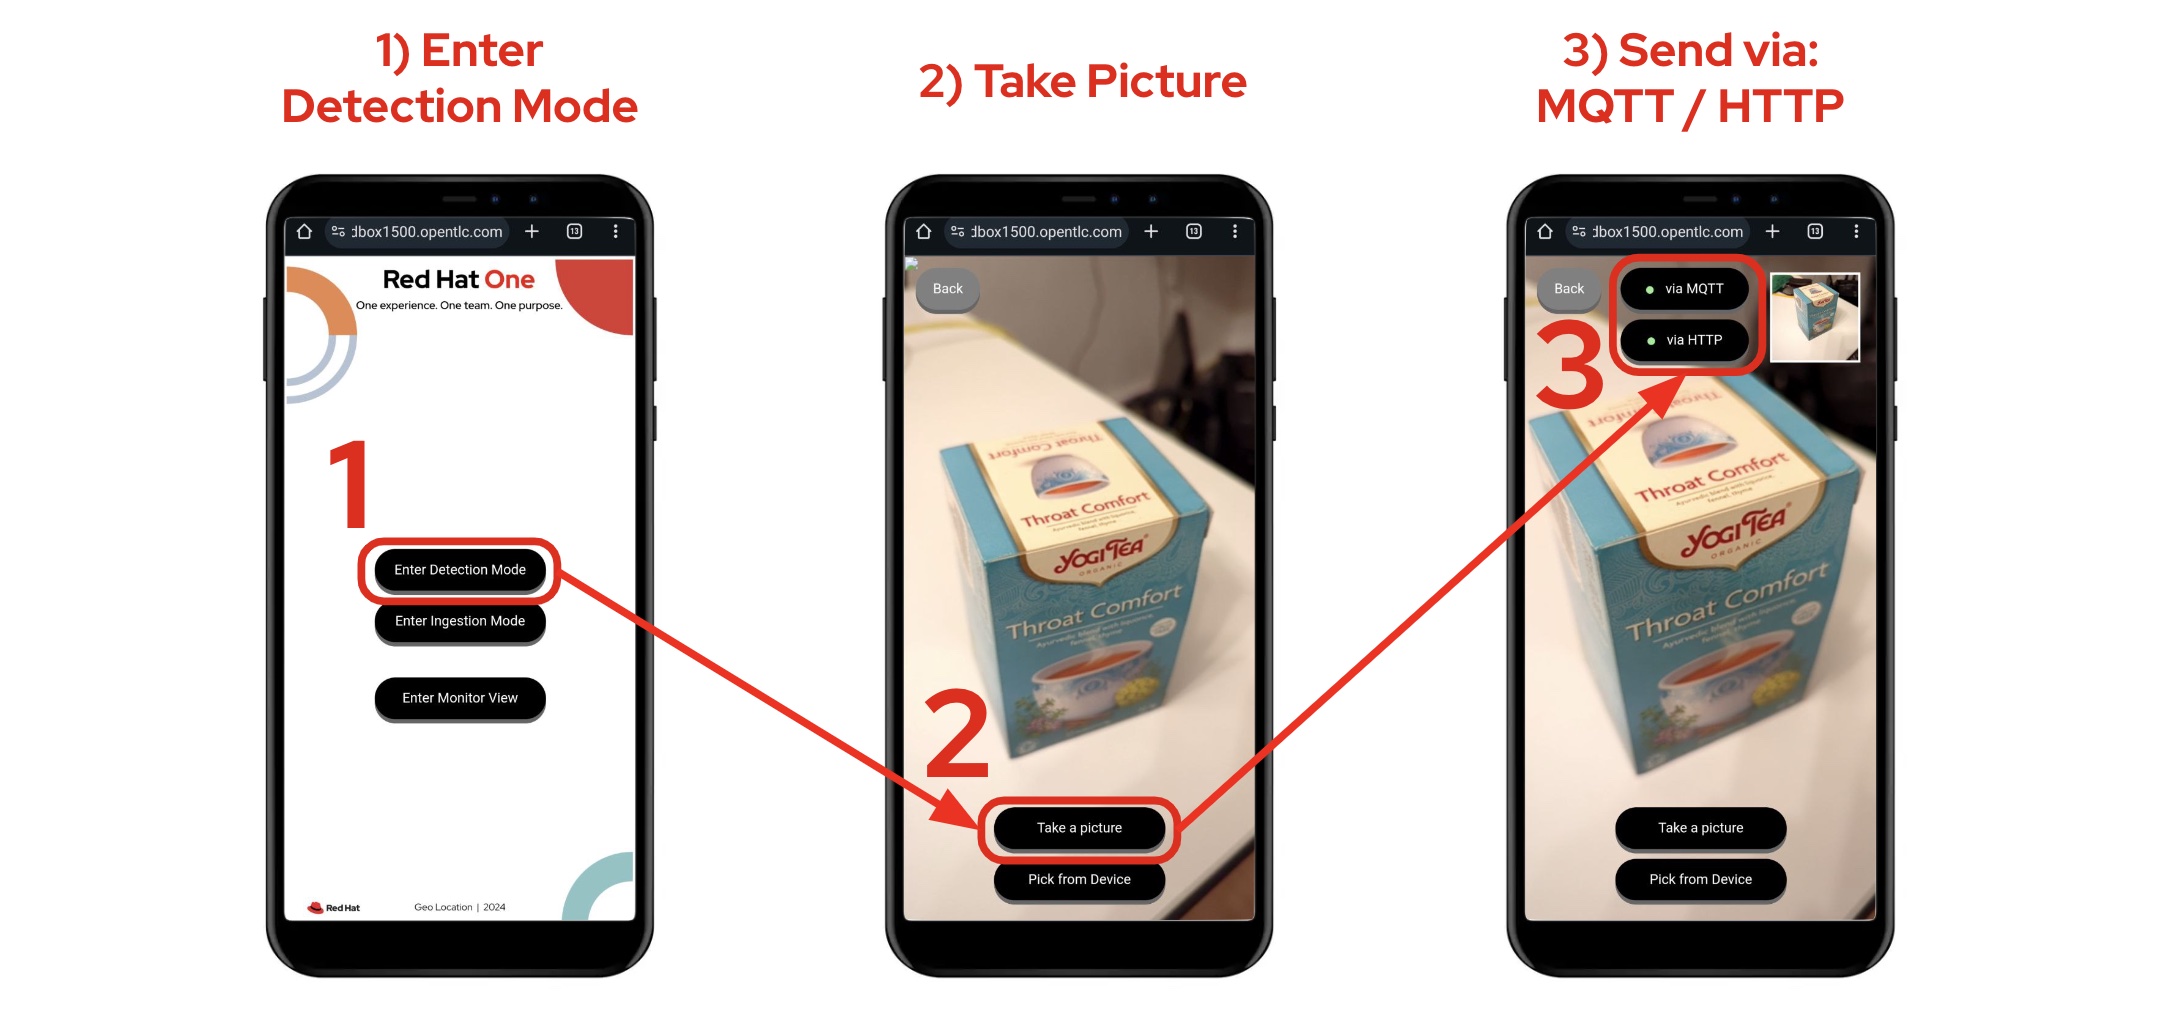
| The App allows you to simulate an image transmittion via HTTP, as would tipically apps interact with backend servers, or via MQTT, a lightweight messaging protocol, commonly used in the IoT, preferable for edge devices constrained by network bandwidth, energy consumption and CPU power. |
| In the demo, the App uses an MQTT library that uses Websockets to connect to the AMQ Broker deployed in the Edge project. The Camel application connects via MQTT to pick up the messages, process them and respond, also via MQTT. |
You should see in your display the following response:

It means it wasn’t able to identify the object.
Let’s now run some positive inferences. We have included in the GitHub repository images that have been used as input to train the model.
Make sure you operate from your computer’s browser, and this time click on the button Pick from Device instead. This action will open your system’s file chooser.
To pick the images to test with, navigate to the following project path:
-
sp-edge-to-cloud-data-pipelines-demo/demo
where you will find the following images:
-
tea-earl-grey.jpg -
tea-lemon.jpg
Try them out. You should obtain positive results with the following responses:
Earl Grey Tea: 3.99 |
Lemon Tea: 4.99 |
In the section that follows you will train a new version of the model (v2) to include a third type of tea, Bali Green Tea, which v1 does not identify.
Before you continue to the next section, run one last negative to confirm the model does not know about it.
-
Enter the Detection Mode in your Smart App
-
Click on the
Pick from Devicebutton. -
Navigate to the following project path:
-
sp-edge-to-cloud-data-pipelines-demo/demo
where you will find the image:
-
tea-bali.jpg
-
-
Select and send it via HTTP or MQTT
You should obtain the negative response:

4.3. Train a new product
The Edge environment has been pre-loaded with training data. This will make it easy for you to produce a second version of the model (v2) which you can try out.
You can visualise the training data by opening Minio's UI and browsing the data S3 bucket. Or you can use the following online S3 browser which nicely displays all the images to use for training, head to:
And enter the following details:
-
Access Key ID:
minio -
Secret Access ID:
minio123 -
Advanced >
-
Endpoint: [Minio’s URL]
-
You can obtain your Minio instance URL by executing the following oc command:
oc get route minio-api -o custom-columns=HOST:.spec.host -n edge1Your connection details on screen should look similar to the picture below:
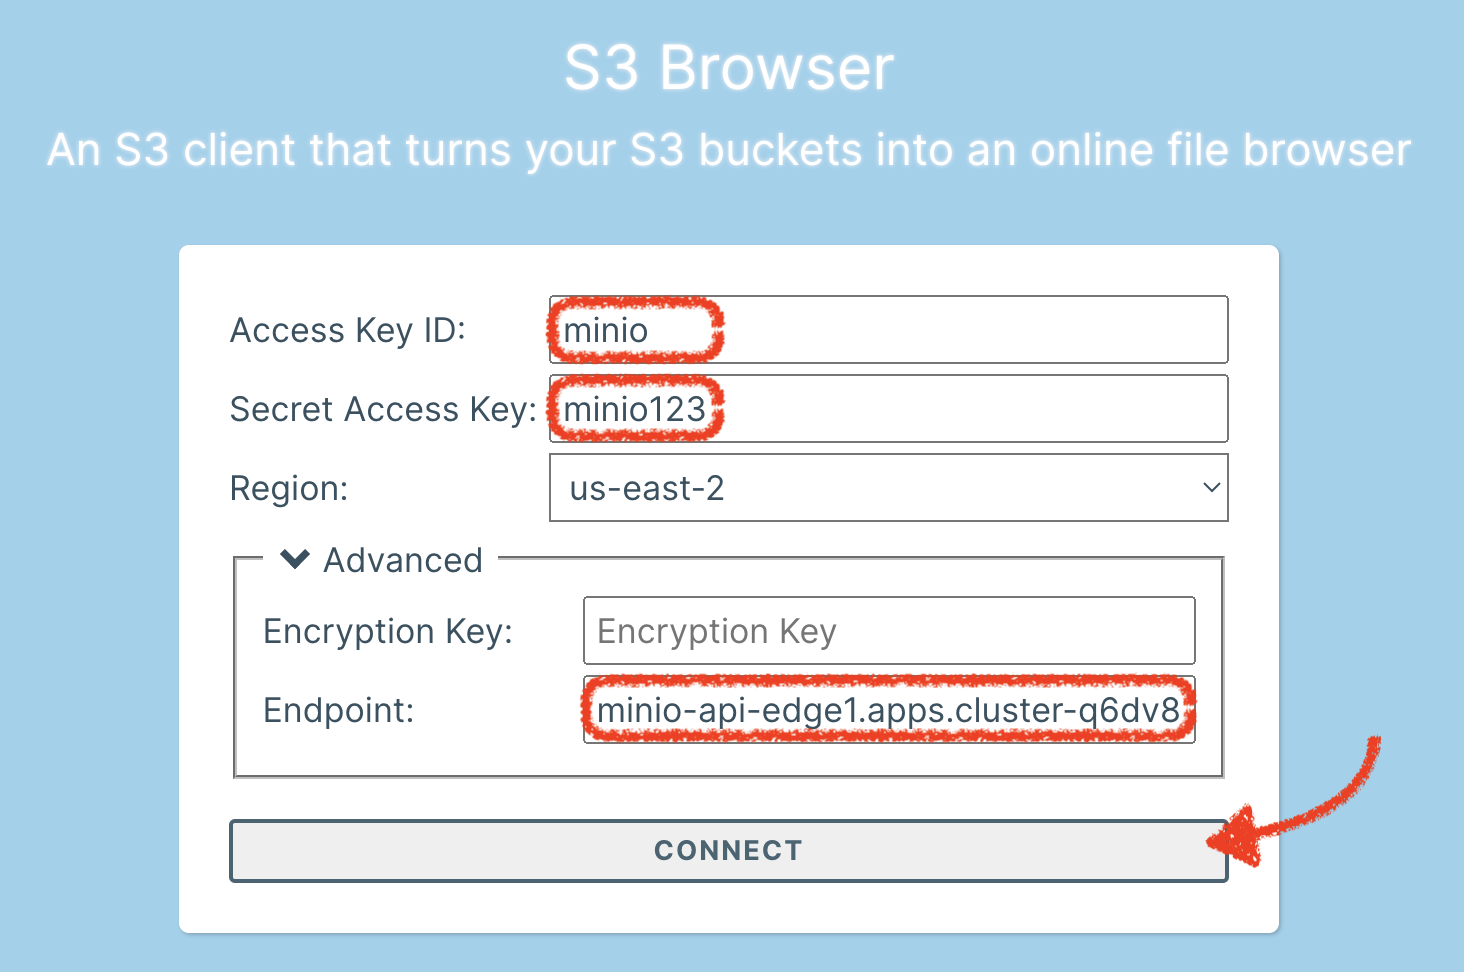
Click CONNECT, and select the folder (bucket) data.
Navigate to the folder images/tea-green where you should find all the training images you’re about to use:
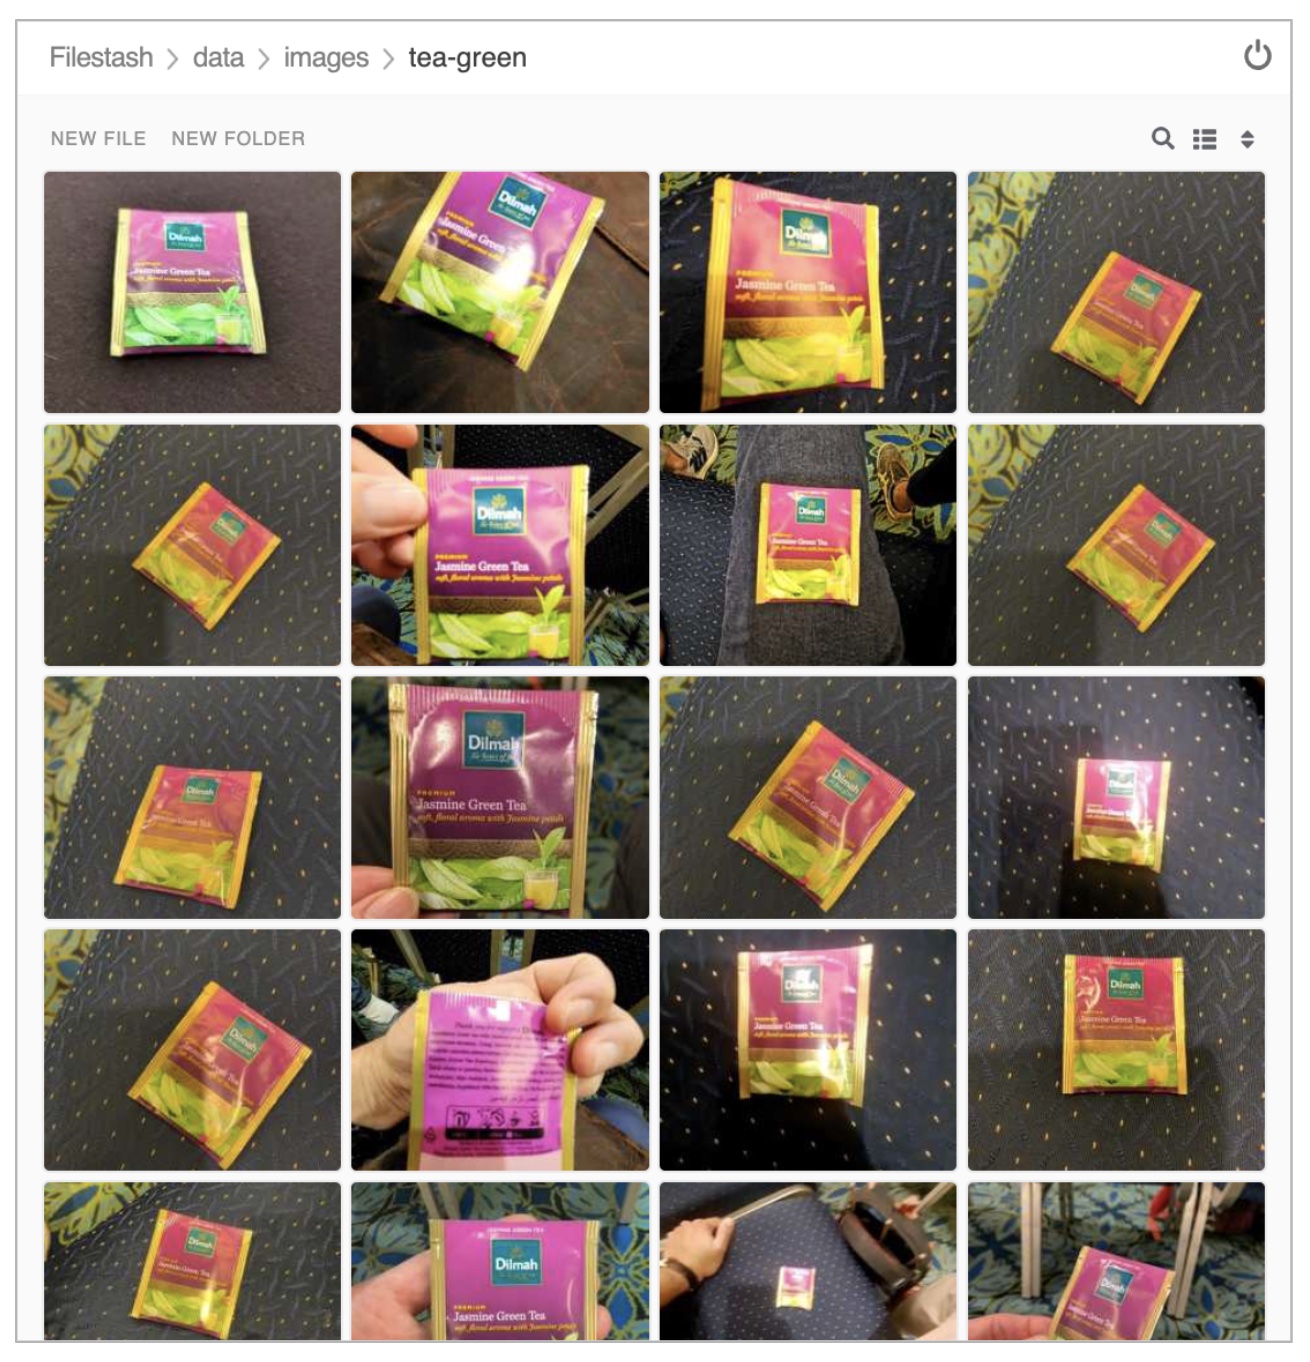
| This collection of training data was captured during a live demonstration where the audience participated in generating the images. |
| A quick reminder: v1 does not know about this type of tea, it only knows about Earl Grey Tea and Lemon Tea. |
This new product is "(Bali) Green Tea" and is labelled as tea-green. The price engine is also preconfigured with a specific price tag for this product.
We can trigger the training process from a hidden administrative page the Shopper application includes. Use the following command to obtain the admin page URL address:
echo "https://`oc get route camel-edge -n edge1 --template={{.spec.host}}`/admin.html"Copy the resulting URL address and use it in a new tab in your computer’s browser.
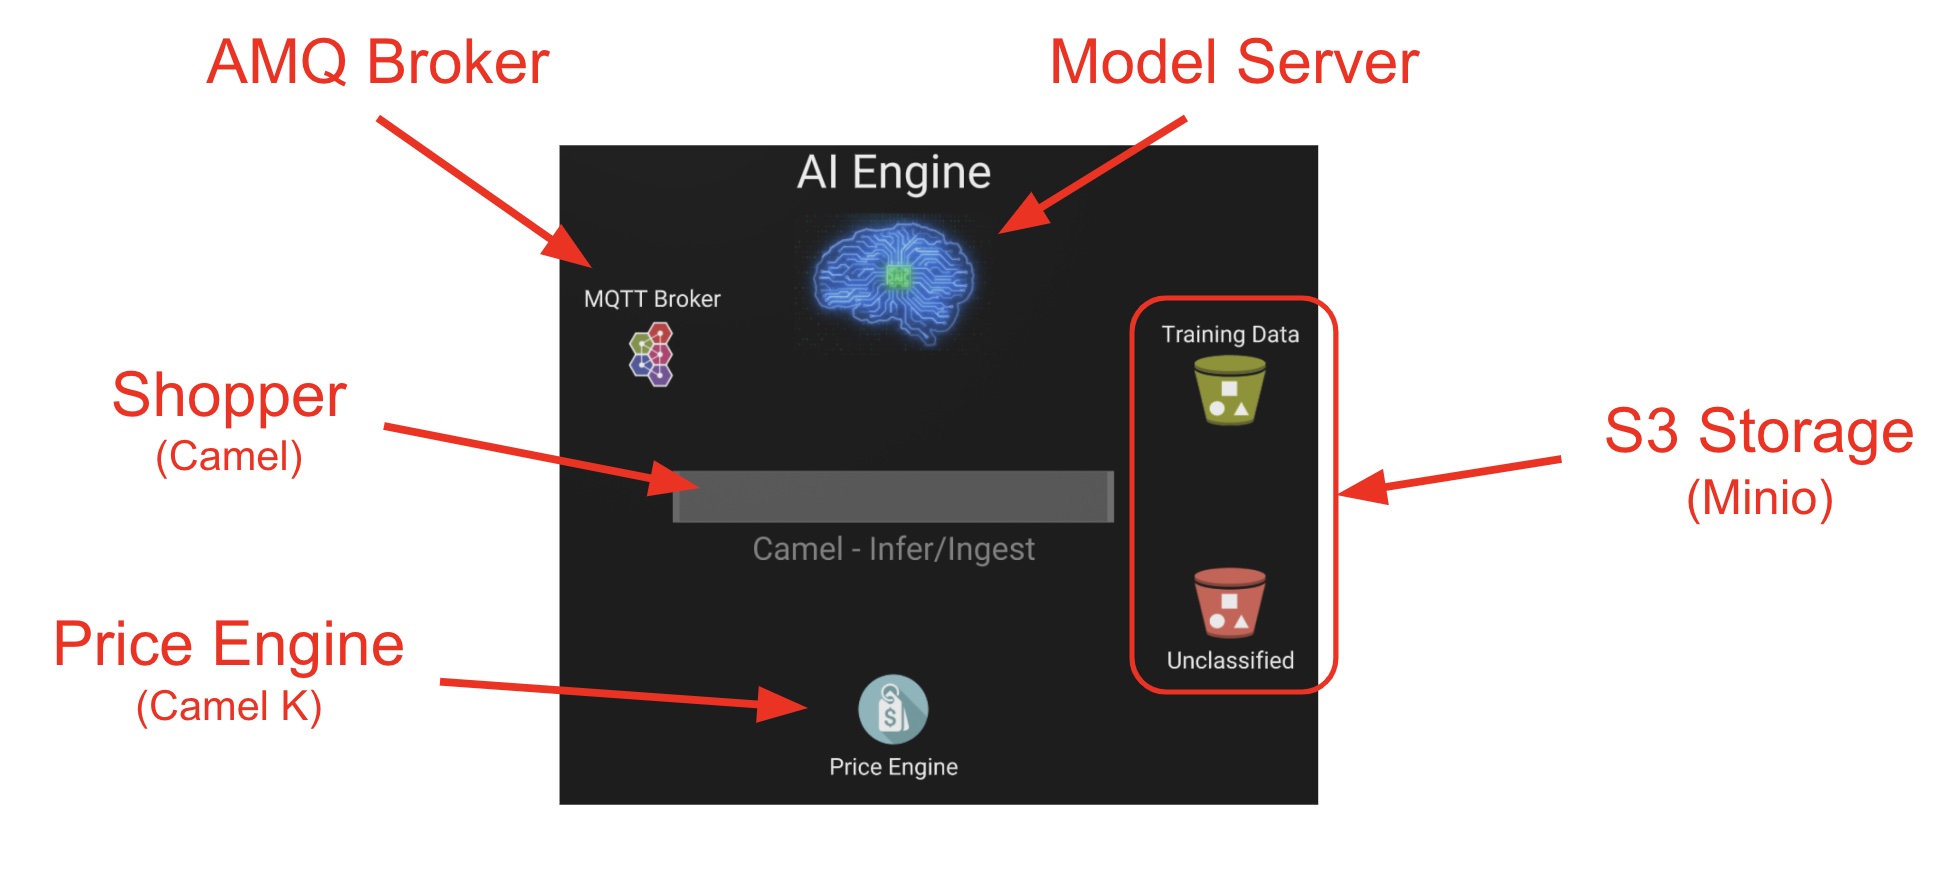
A monitoring view will display all the playing parts in the demo. You will already be familiar with most of the parts shown on the monitoring view (which map to those visible from your Topology view from the OpenShift's console):
4.3.1. Review the Data Acquisition phase
Prior to initiating the training process, and now that you’re familiar with the monitoring view, let’s rewind a little and remind ourselves what processes are involved in the Data Acquisition phase.
| We are bypassing the ingestion (Data Acquisition) phase to speed up the process of producing a second version of the model. Later you will participate in generating your own training data to produce a third version of the model. |
The illustration below shows how, during the Data Acquisition phase, training data is generated from devices and pushed to the system.
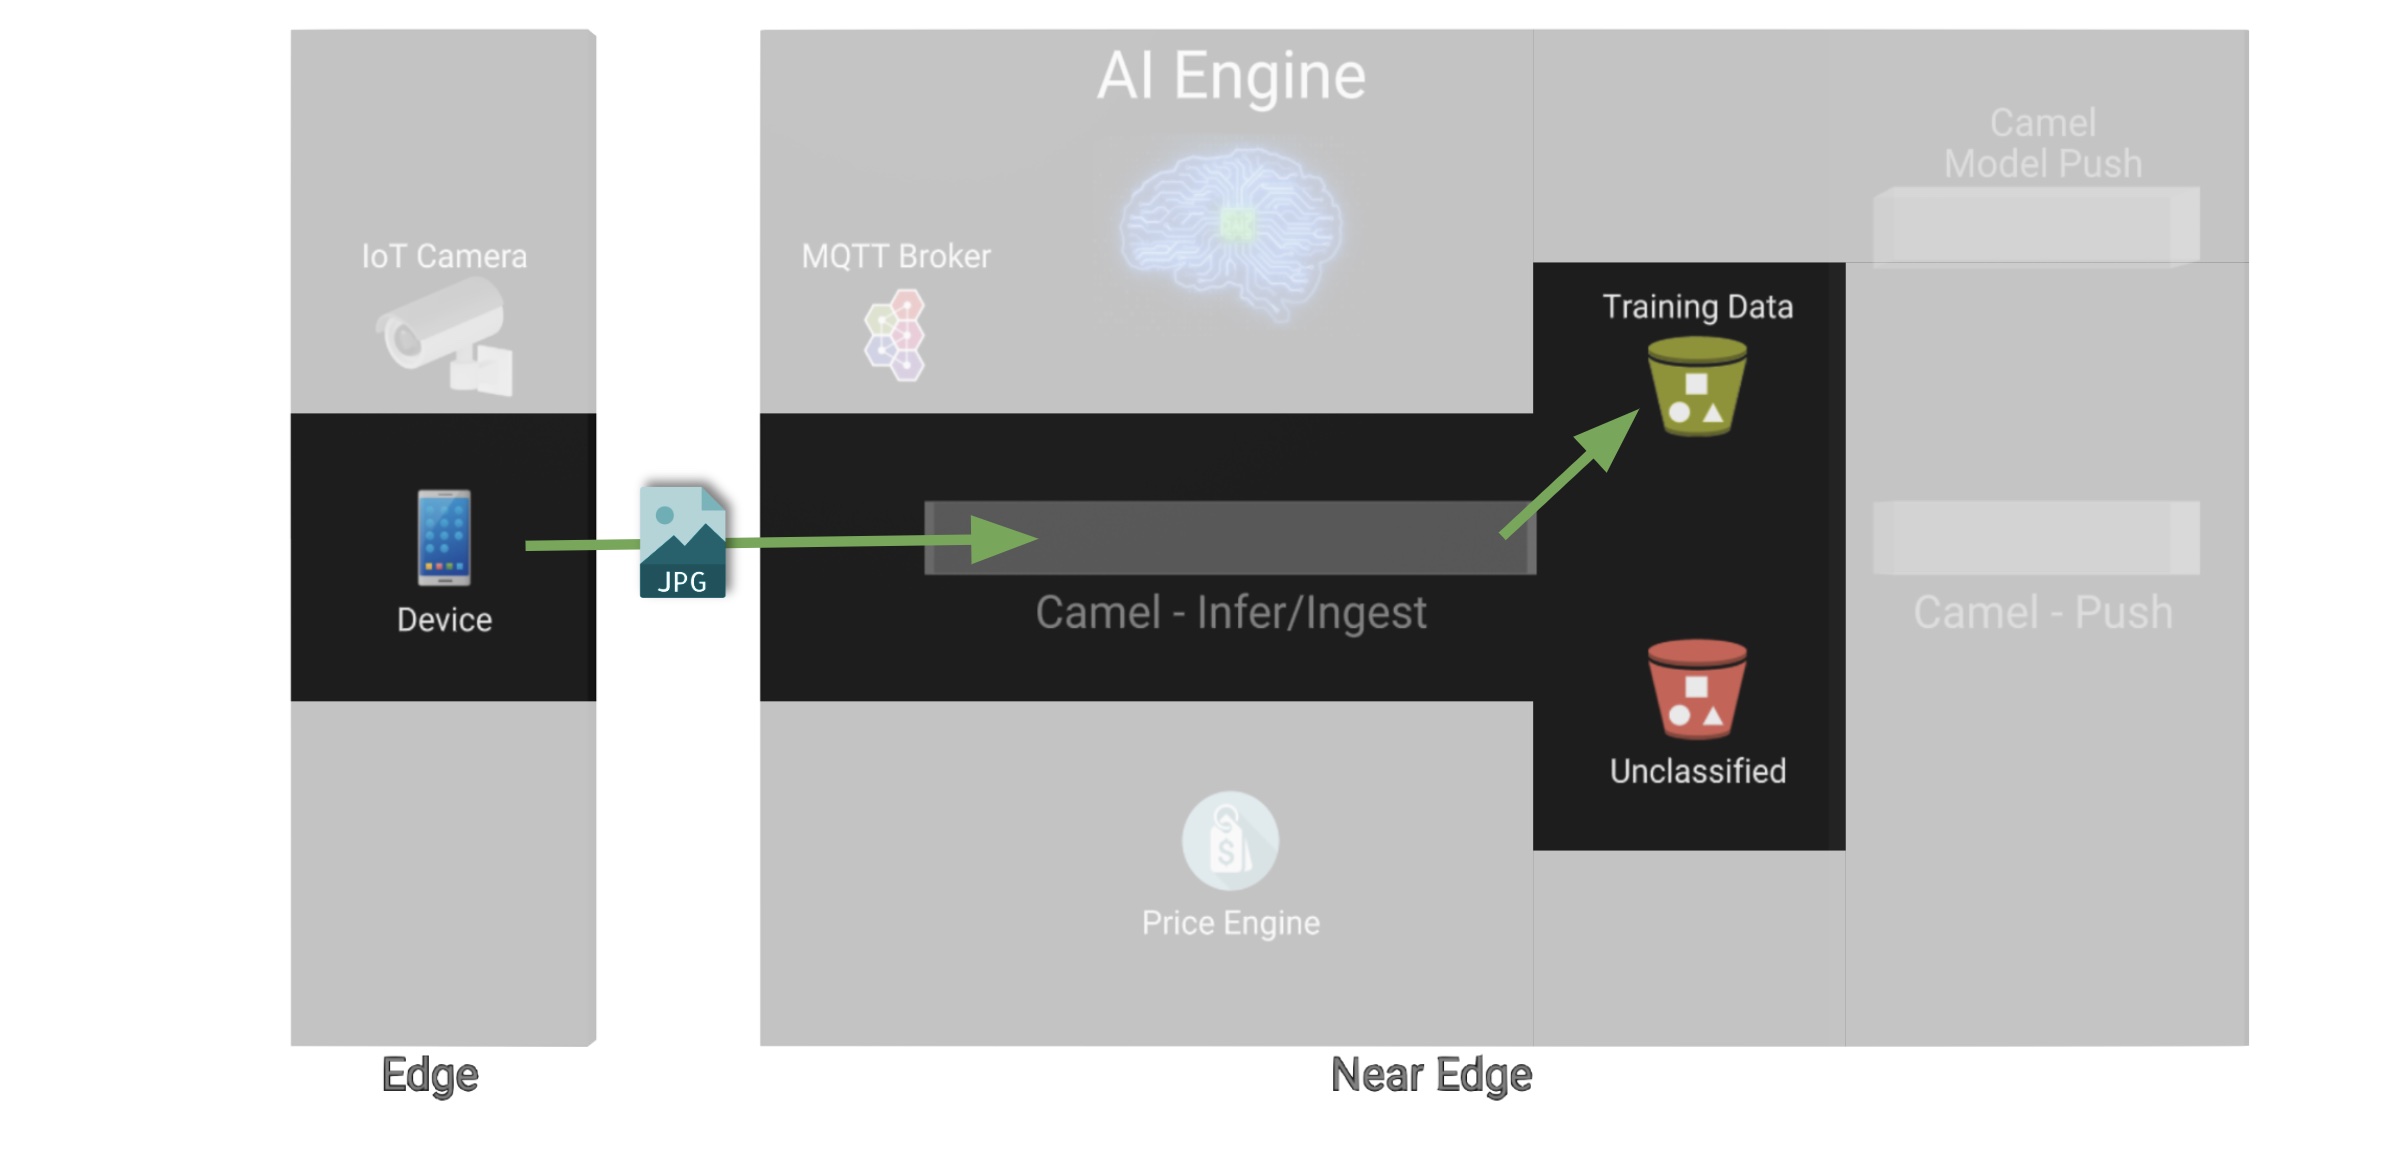
Each image, captured by a worker and sent over the network, is received and pushed to local S3 storage on the Edge. This phase may take a certain period of time until a large number of images is collected. To maximise accuracy you ideally want to train the model with vast amounts of training data.
4.3.2. Enter the Training phase
To initiate the training process, click the button on the upper-left side of the window:
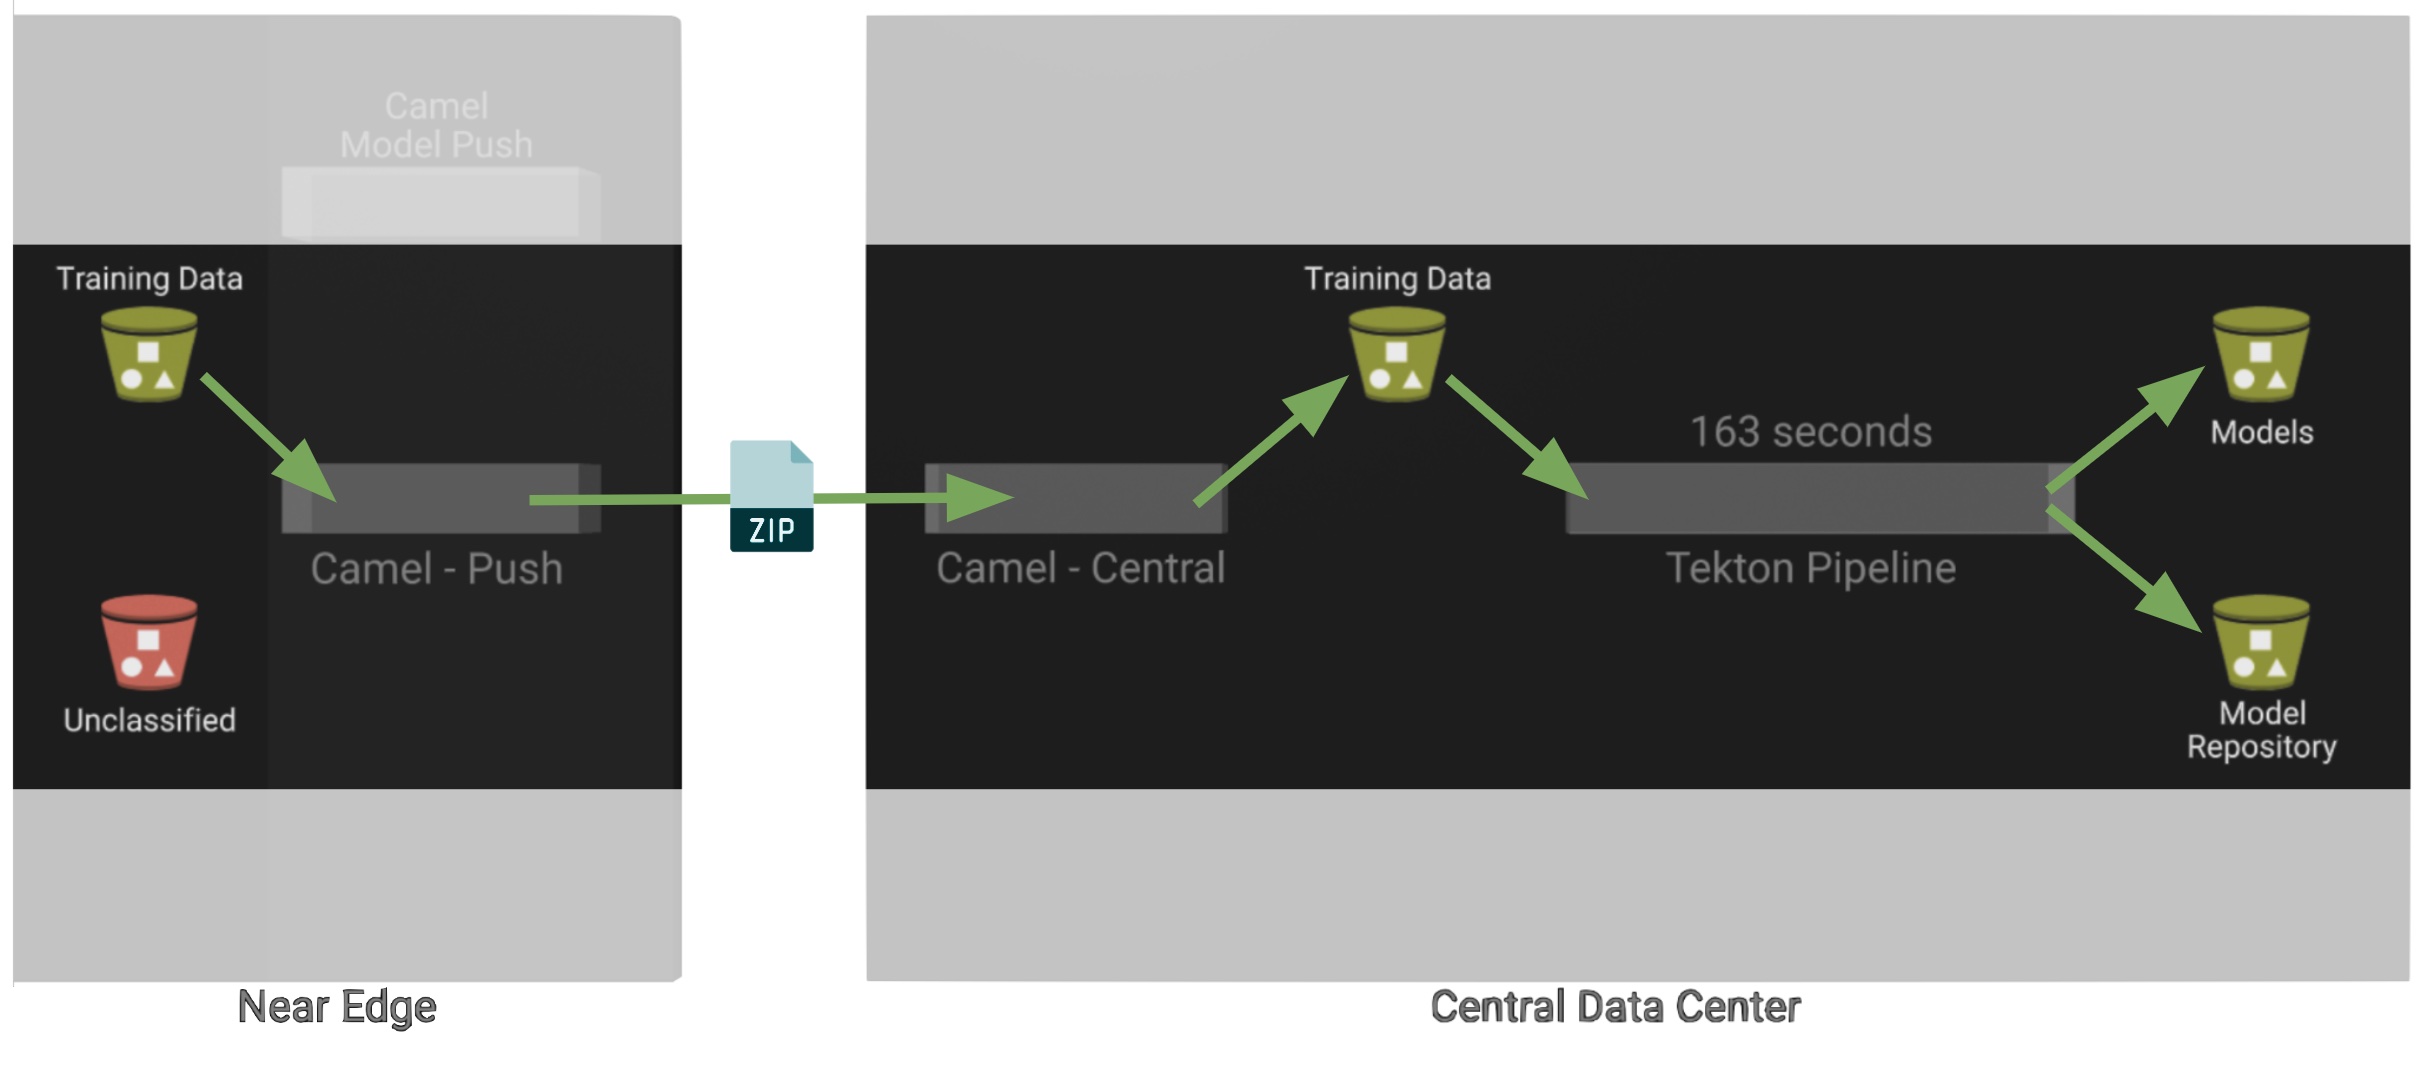
After you click Train Data, you’ll see in the monitoring view a series of live animations illustrating the actions actually taking place in the platform. The following enumeration describes the process:
-
The click action triggers a signal that a Camel integration (Manager) picks up.
-
The Manager reads all the training data from the S3 bucket where it resides and packages it as a ZIP container.
-
The Manager invokes an API served from the Core Data Center (Central) to send the ZIP data.
Edge and Core are connected via Service Interconnect. Both regions are running an instance of Skupper to form virtual services which securely interconnect systems from both sides. -
The system Feeder (Camel) exposing the above requested API, unpacks the ZIP container and pushes the data to a central S3 service used as the storage system (ODF) for training new models.
-
The same system Feeder sends a signal via Kafka to announce the arrival of new training data to be processed.
-
The system Delivery (Camel) is subscribed to the announcements topic. It receives the Kafka signal and triggers the Pipeline responsible the create the a new model version.
-
The pipeline (Tekton) kicks off. It reads from the S3 storage system all the training data available and executes the Data Science notebooks based on TensorFlow
The entire execution of the pipeline may take between 2-5 minutes depending on the resources allocated in the environment. -
At the end of the pipeline process, a new model is pushed to an edge-dedicated topic where new model placed.
-
A copy of the new model version is also pushed to a Model repository. In this demo, just another S3 bucket, where a history of model versions is kept.
All the steps above form part of the Data Preparation and Modelling phase (described in the Architecture chapter) and are well illustrated in the diagram below:
4.3.3. The Delivery phase
The end-to-end process is not done yet. It then enters into the Delivery phase. The new model has now been pushed to an S3 bucket edge1-ready that is being monitored by an integration point on the Edge (Manager)
| Edge and Core are connected via Service Interconnect. Both regions are running an instance of Skupper to form virtual services which securely interconnect systems from both sides. |
When the Tekton pipeline uploads the new model to the S3 bucket, the Edge Manager notices the artifacts and initiates the download of the model and hot deploys it in the TensorFlow model server, as shown in the picture below:
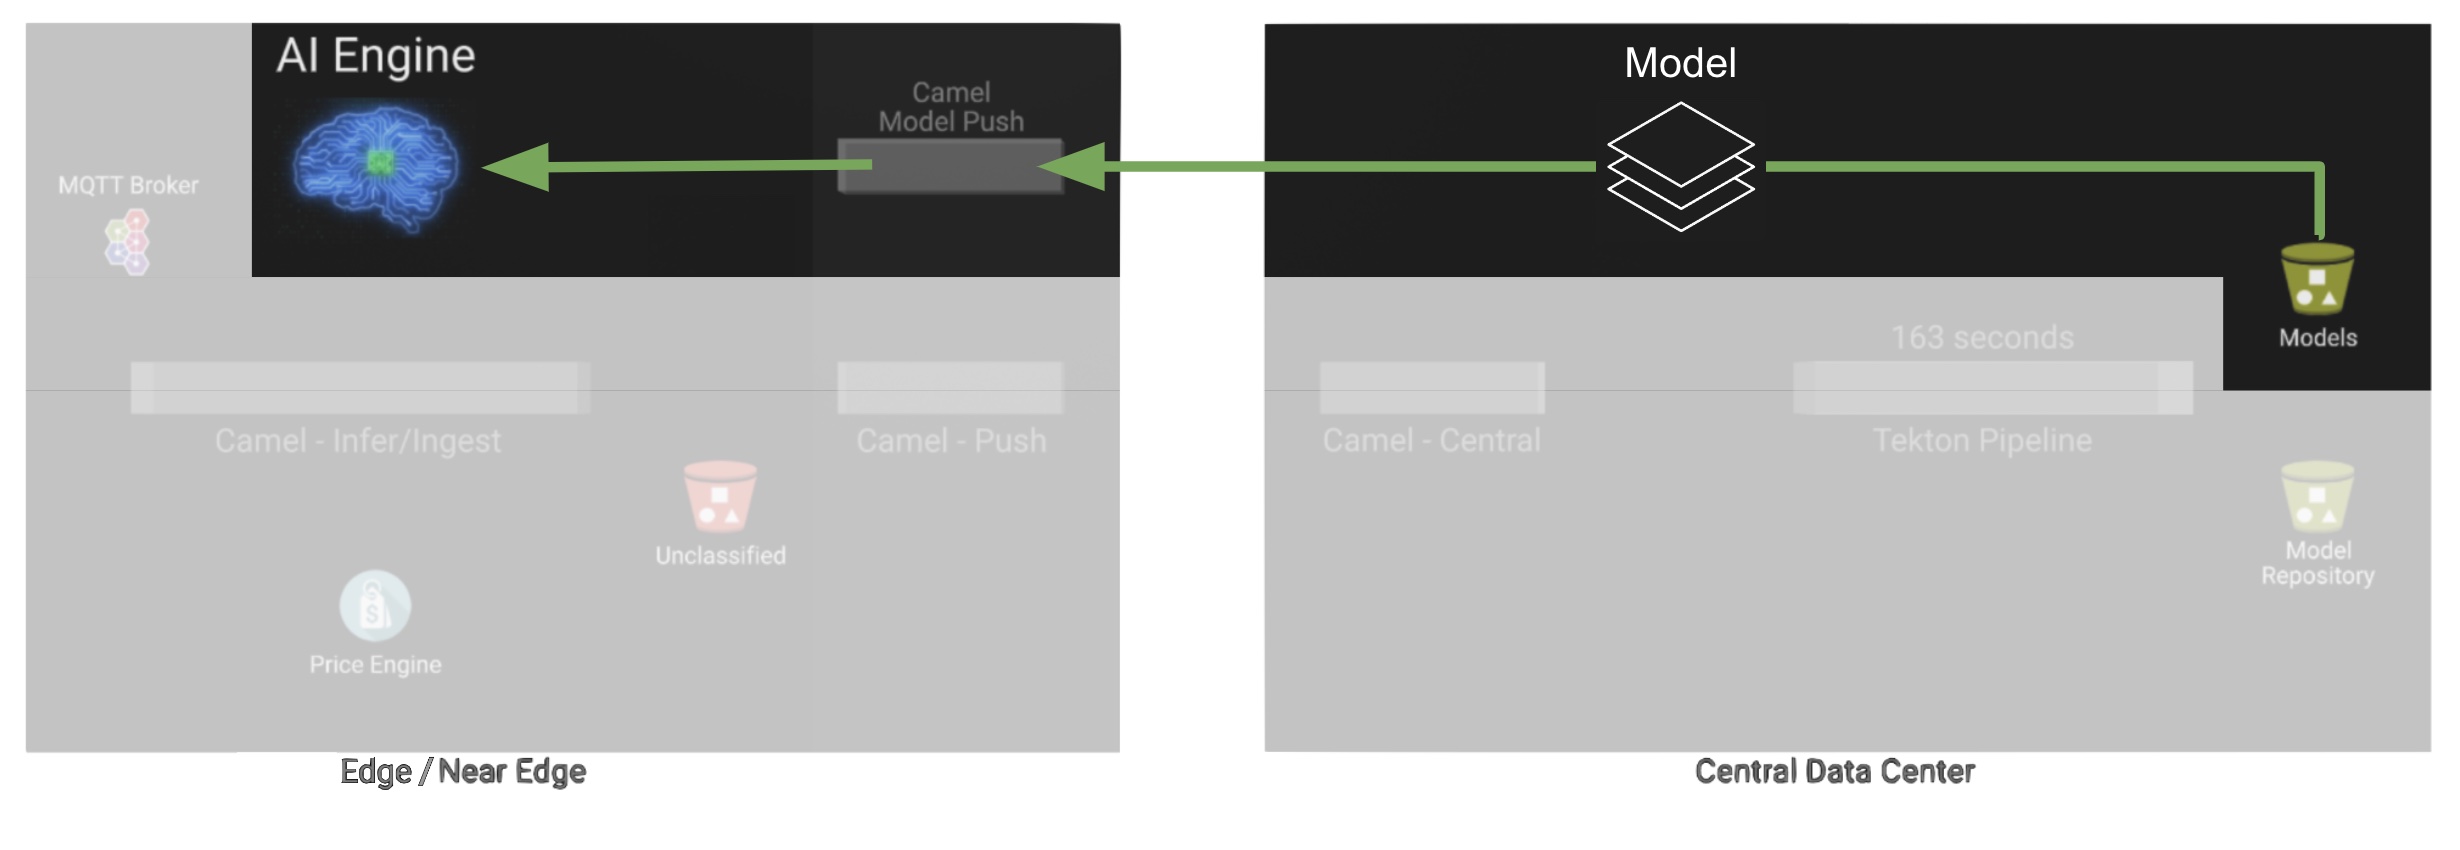
The AI/ML engine, powered by the TensorFlow Model Server, reacts to the new version (v2), now available in its local S3 bucket, and initiates a hot-deployment. It loads the new version and discards the old one that was held in memory. This process happens without service interruption. Clients sending inference requests inadvertently start obtaining results computed with the new hot-deployed version (v2).
4.3.4. The Inferencing phase
The platform keeps running its live services at all times. Customers (shoppers) and workers interact with the platform while, in the background, new models are continuously being trained, delivered and deployed.
The demo’s inferencing phase is illustrated in the picture below:
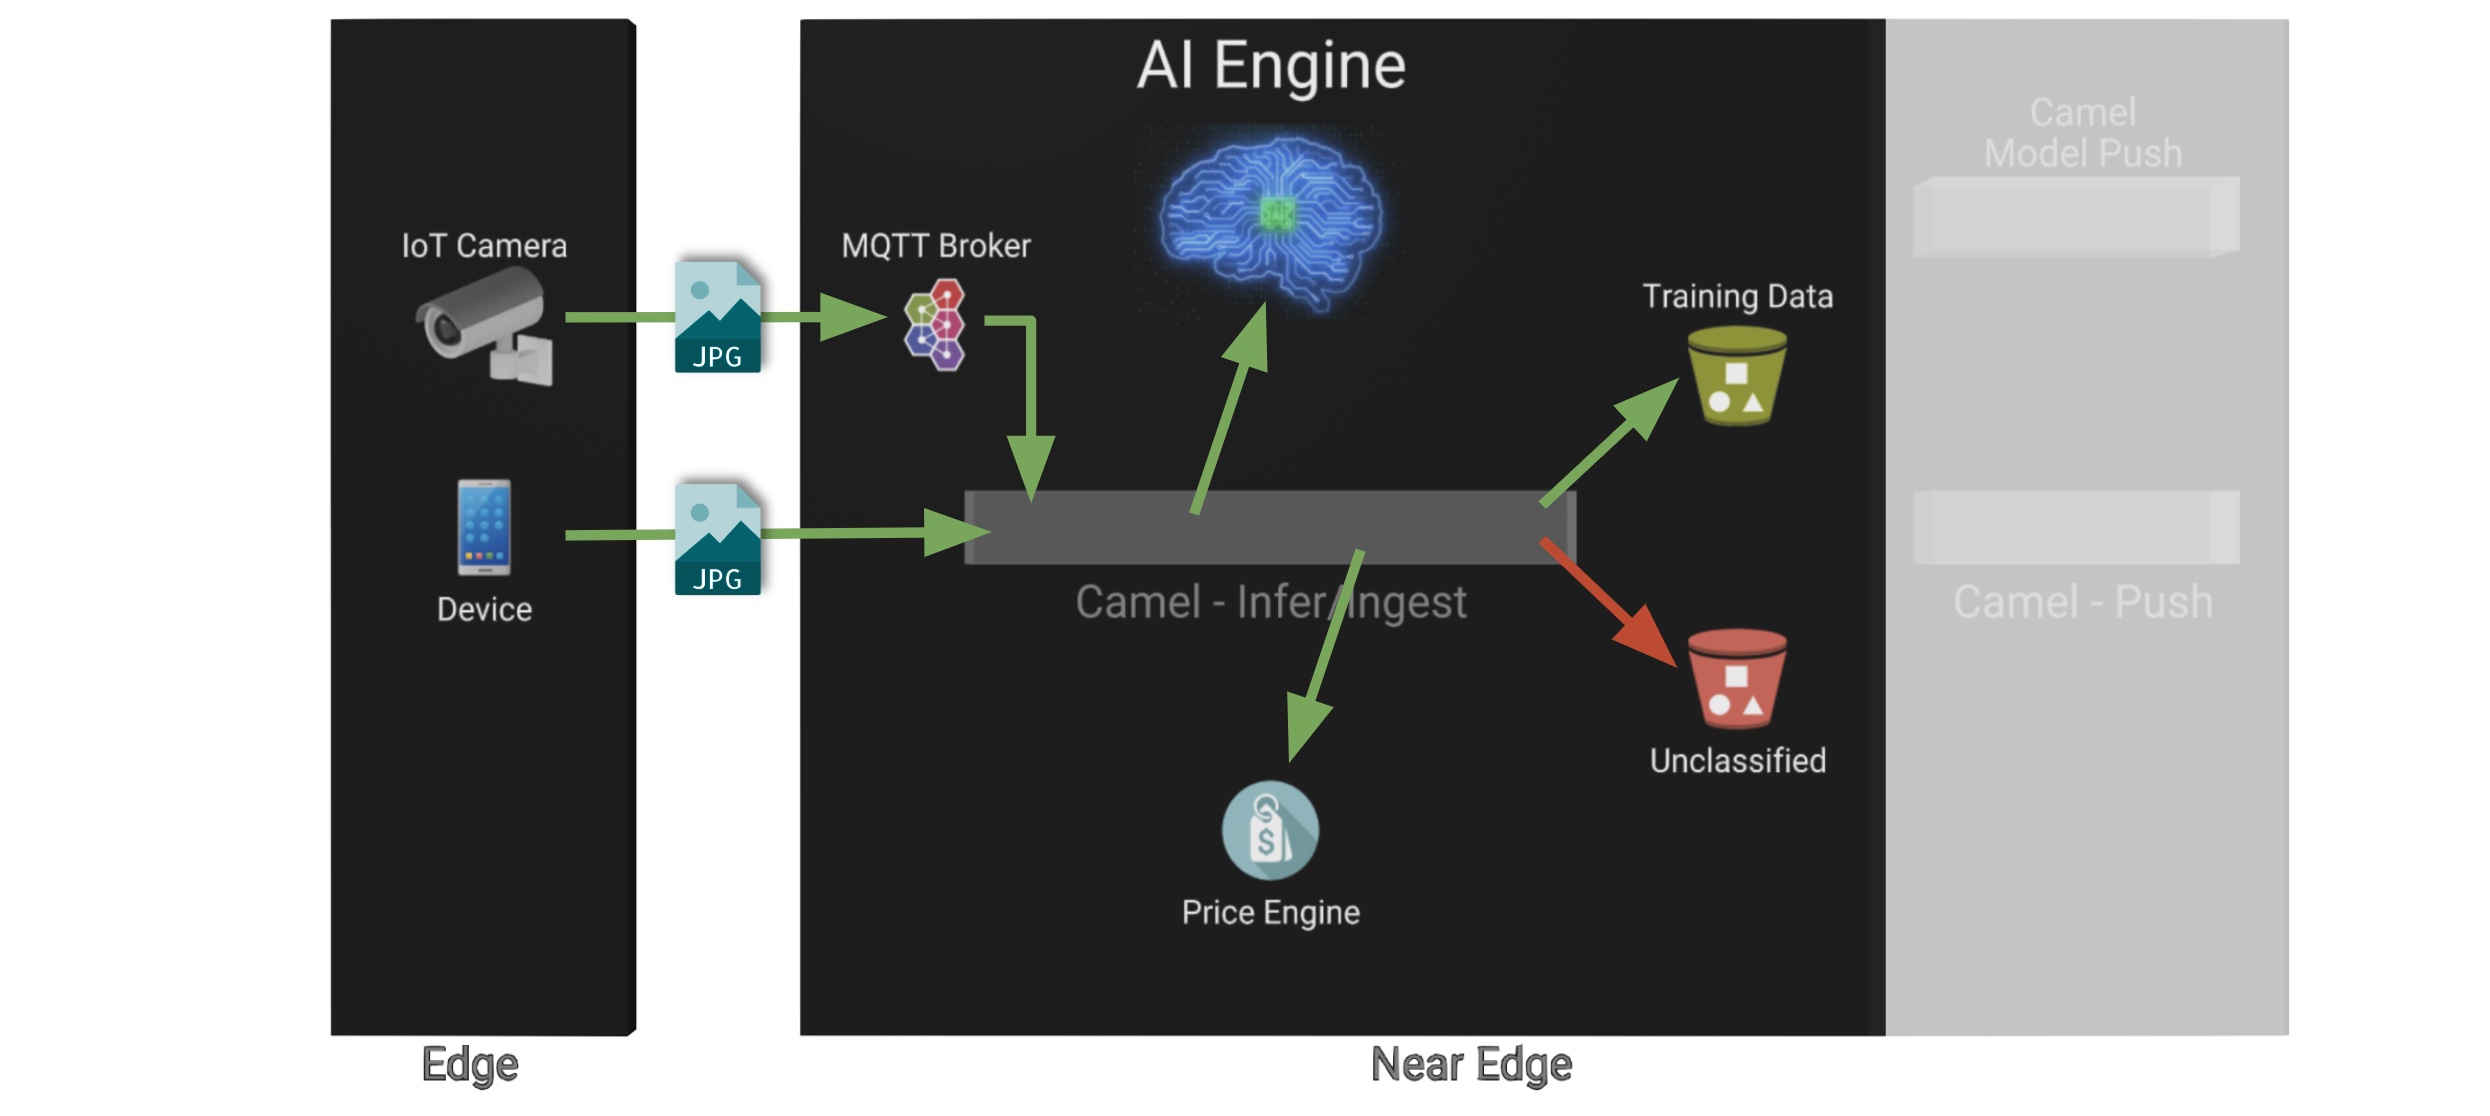
You should already be familiar with the flows above. You had the chance to perform some positive/negative tests via HTTP/MQTT. The Shopper application (Camel) first sends an inference request against the AI/ML engine to identify the product, then:
-
If the AI engine identifies the product, it provides a label, for example
tea-lemon, and Camel calls the Price Engine to obtain a price tag for that product. The image is also kept in S3 storage as it may be used to improve the accuracy of future models. -
If the AI engine does not identify the product (negative response
other), Camel directly pushes the image to an S3 bucket of unidentified images. This may help Data Scientists to analyse the data.
You’ve already interacted with the application using the demo App. Let’s use it again to try out the newly trained version.
|
Before continuing, make sure your pipeline has finished execution. You can use your OpenShift's console to inspect the state of the PipelineRun, or you can execute the following When the pipeline completes successfully, you should see the following output: NAME SUCCEEDED REASON STARTTIME COMPLETIONTIME train-model-run-ljrdk True Succeeded 92m 89m |
Go back to the Smart Application in your browser and this time, with the newly trained model (v2), send the Bali Green Tea image that v1 didn’t know about.
-
Enter the Detection Mode in your Smart App
-
Click on the
Pick from Devicebutton. -
Navigate to the following project path:
-
sp-edge-to-cloud-data-pipelines-demo/demo
where you will find the image:
-
tea-bali.jpg
-
-
Select and send it via HTTP or MQTT
This time, the product should be identified, and you should obtain a price tag as follows:
(Bali) Green Tea: 2.49 |
Bravo !! you have completed the full cycle.
4.4. Create your own product
Up until now, you’ve played with pre-configured systems, and pre-loaded data, to train v2. It is time to go one level up. You will configure the system to create a new entry in the product catalogue, generate training data for the new product, train the new model v3, and run live inferences against it.
4.4.1. Configure the Price Engine
First things first, head to your OpenShift console and find the following ConfigMap:
-
catalogue
This configmap is owned by the Price Engine and configures all the products available.
Edit the catalogue to include a new product.
Follow the steps below to find your way:

-
From the console (
edge1project), click on the menu optionConfigMaps -
From the list of displayed configmaps, select
catalogue. -
You’ll find the option to
Edit ConfigMapfrom the top right-right corner of the console.-
Click Actions → Edit ConfigMap
-
-
Locate the lower-right corner of the text area
-
Click and drag the corner downwards to expand the text area.
The JSON data configures the products. You’ll find in the definition all the products you have been playing with.
Now include in the configuration a new product.
If one does not come to mind, use the JSON data below to configure a Computer Mouse product:
    {
      "item": "computer-mouse",
      "label": "Computer Mouse",
      "price": 19.99
    },
Copy the JSON node above and paste it in the ConfigMap.
Make sure your JSON document is valid after finishing editing. Make sure commas (,) are in the right place.
|
Click Save.
Now you need to restart the Price Engine. You can simply kill the pod and Kubernetes will restart a new one that will read the new ConfigMap value.
You can use the web Console to do so, or execute the oc command below:
oc delete pod -n edge1 `oc get pods -n edge1 | grep price | awk '{print $1}'`You can validate, by inspecting the logs, the new started pod has loaded the new product catalogue. Again, you can use the web console, or execute from your terminal the command below:
oc logs svc/price-engine -n edge1In the output logs from the command above, you should find the value "Computer Mouse". Your logs should look similar to:
... INFO [pri.xml:74] (Camel (camel-1) thread #1 - timer://products) ["Earl Grey Tea", "(Bali) Green Tea", "Lemon Tea", "Computer Mouse", "Other"]Next, you need to configure the Smart Application to allow selecting the new product for training.
4.4.2. Configure the Shopper application
You need to perform a similar operation. From your OpenShift console, find the following ConfigMap:
-
shopper-training-options
This ConfigMap is owned by the Shopper (Camel) integration and configures all the trainable products from the App’s 'Ingestion Mode' option (Data Acquisition).
Follow the same steps as previously done to find the ConfigMap and open the Edit window.
-
From the console (
edge1project), click on the menu optionConfigMaps -
From the list of displayed configmaps, select
shopper-training-options. -
You’ll find the option to
Edit ConfigMapfrom the top right-right corner of the console.-
Click Actions → Edit ConfigMap
-
-
Locate the lower-right corner of the text area
-
Click and drag the corner downwards to expand the text area.
Replace the old product by the new one.
If you used the previous sample configuration for the "Computer Mouse", copy the value below and replace the old product in your text area:
[
  {
      "item": "computer-mouse",
      "label": "Computer Mouse"
  }
]| You can also add a sequence of products. Instead of deleting the old product, you can add the new one separated with a comma. |
Make sure your JSON document is valid after finishing editing. Make sure commas (,) are in the right place.Also, the values in this configuration need to match those in the product catalogue. |
| This information configures display options in the Smart App. Notice you don’t define a price tag here. |
Click Save.
Now you need to restart the Shopper application. You can simply kill the pod and Kubernetes will restart a new one that will read the new ConfigMap value.
You can use the Web Console to do so, or execute the oc command below:
oc delete pod -n edge1 `oc get pods -n edge1 | grep shopper | awk '{print $1}'`You’re now ready to generate and ingest training data.
4.4.3. Generate Training Data
In this section you will use the web based Smart App to capture images and push them to the platform. The easiest way to capture images is to use your smart phone.
Share the URL’s address with your phone and open it with the device’s browser.
Follow the steps illustrate below to capture and send images:
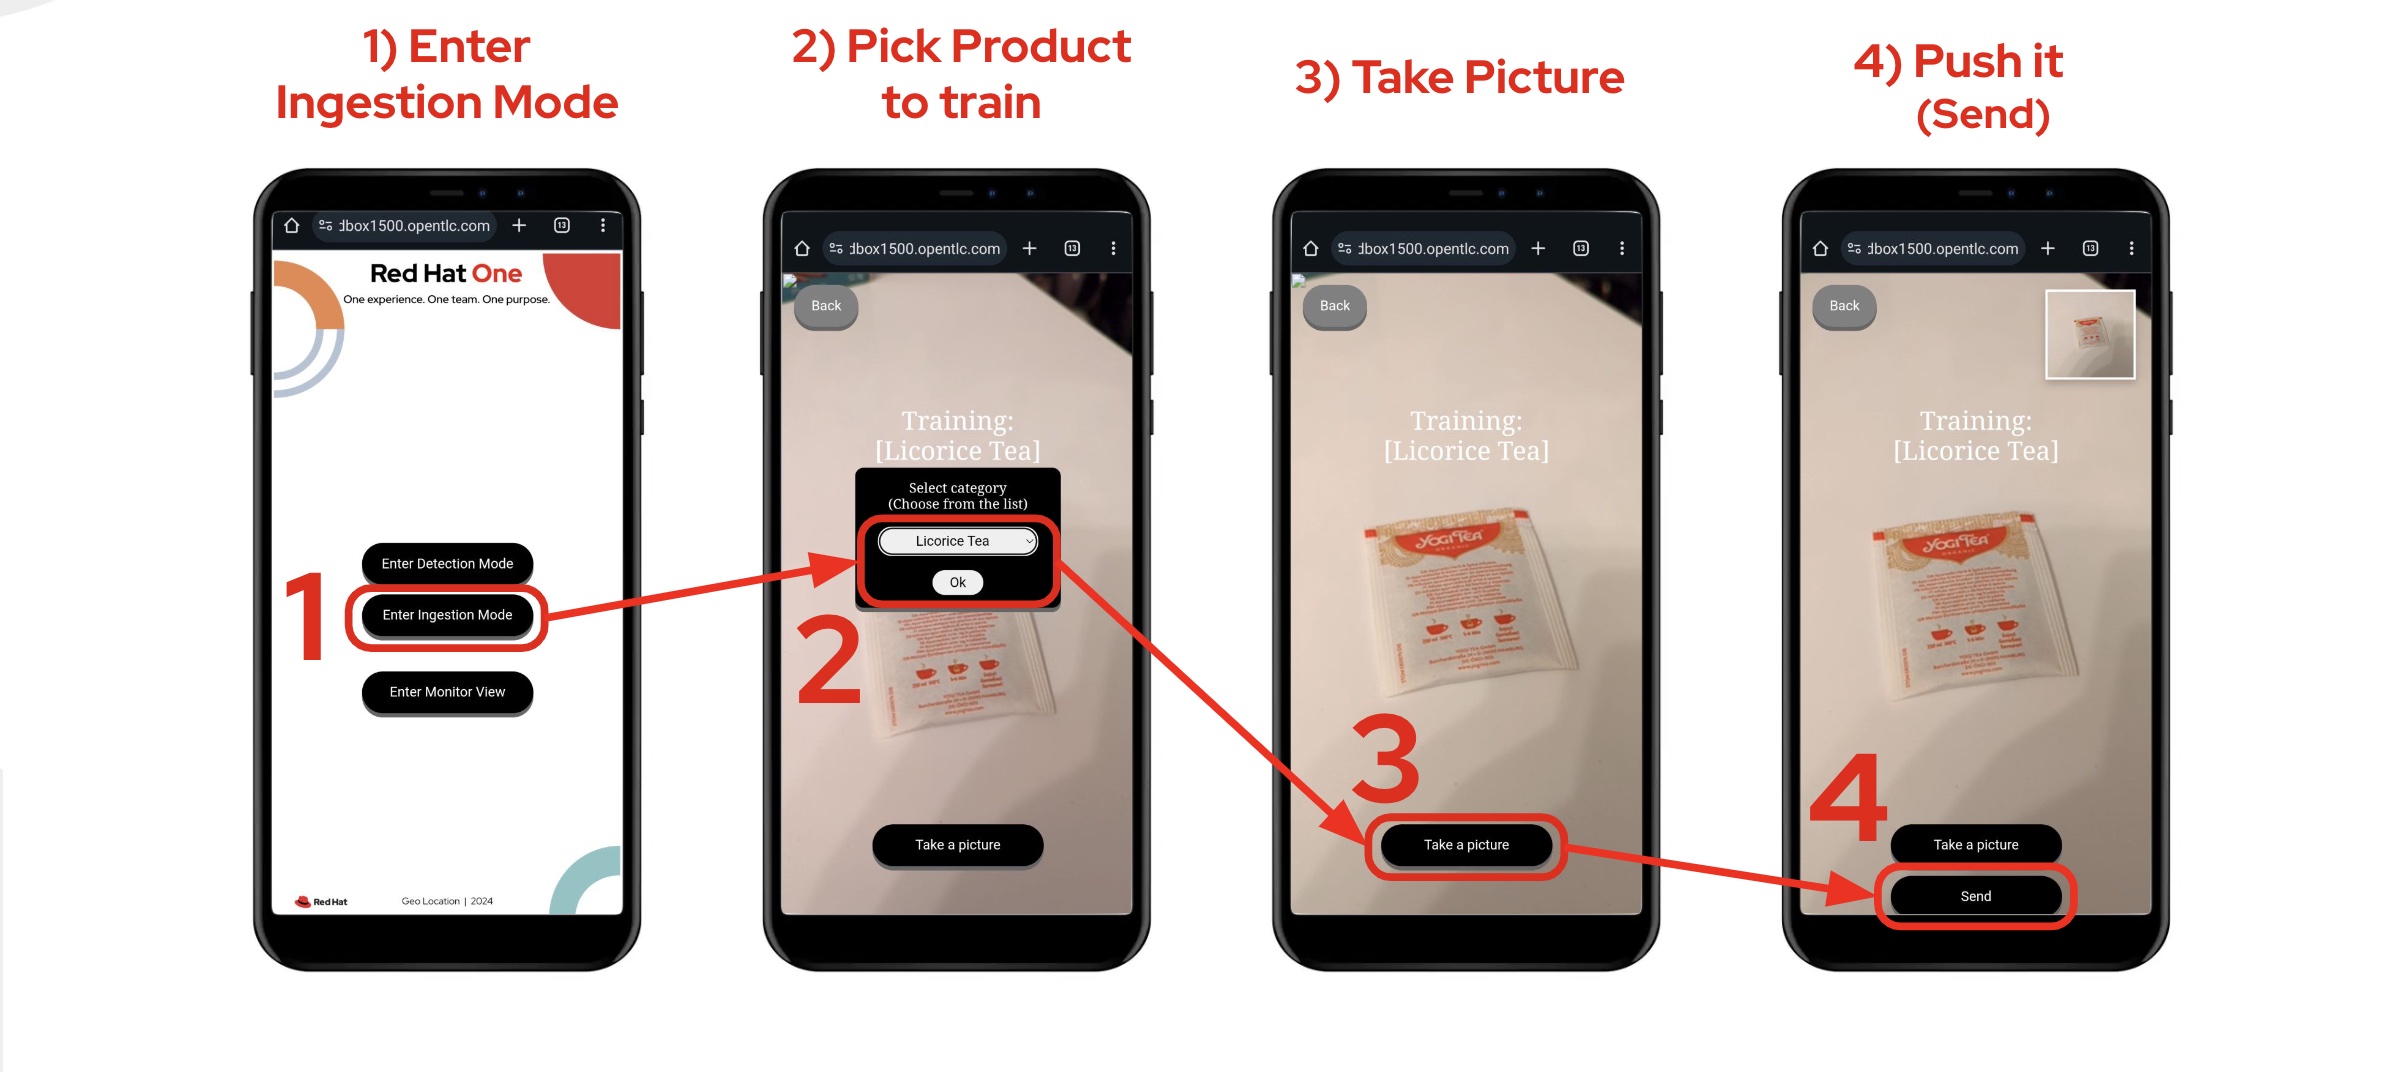
Above, in step 2 you should find the option that you configured earlier. If you used the sample JSON snippets you should find on your screen the option:
-
Computer Mouse
Now, take various pictures and push the as indicated. Change angles, rotate the object, flip the object. The more data you push, the more accurate your model will become.
| AI/ML models are generally trained with thousands/millions of pictures to achieve the best results. However, with only few images for experimentation, it should work too. |
| If you open the monitoring view while pushing data from your smart device, you should see live interactions with the Edge systems. |
When you’re done with the Ingestion phase, you should end up with a collection similar to the picture below:
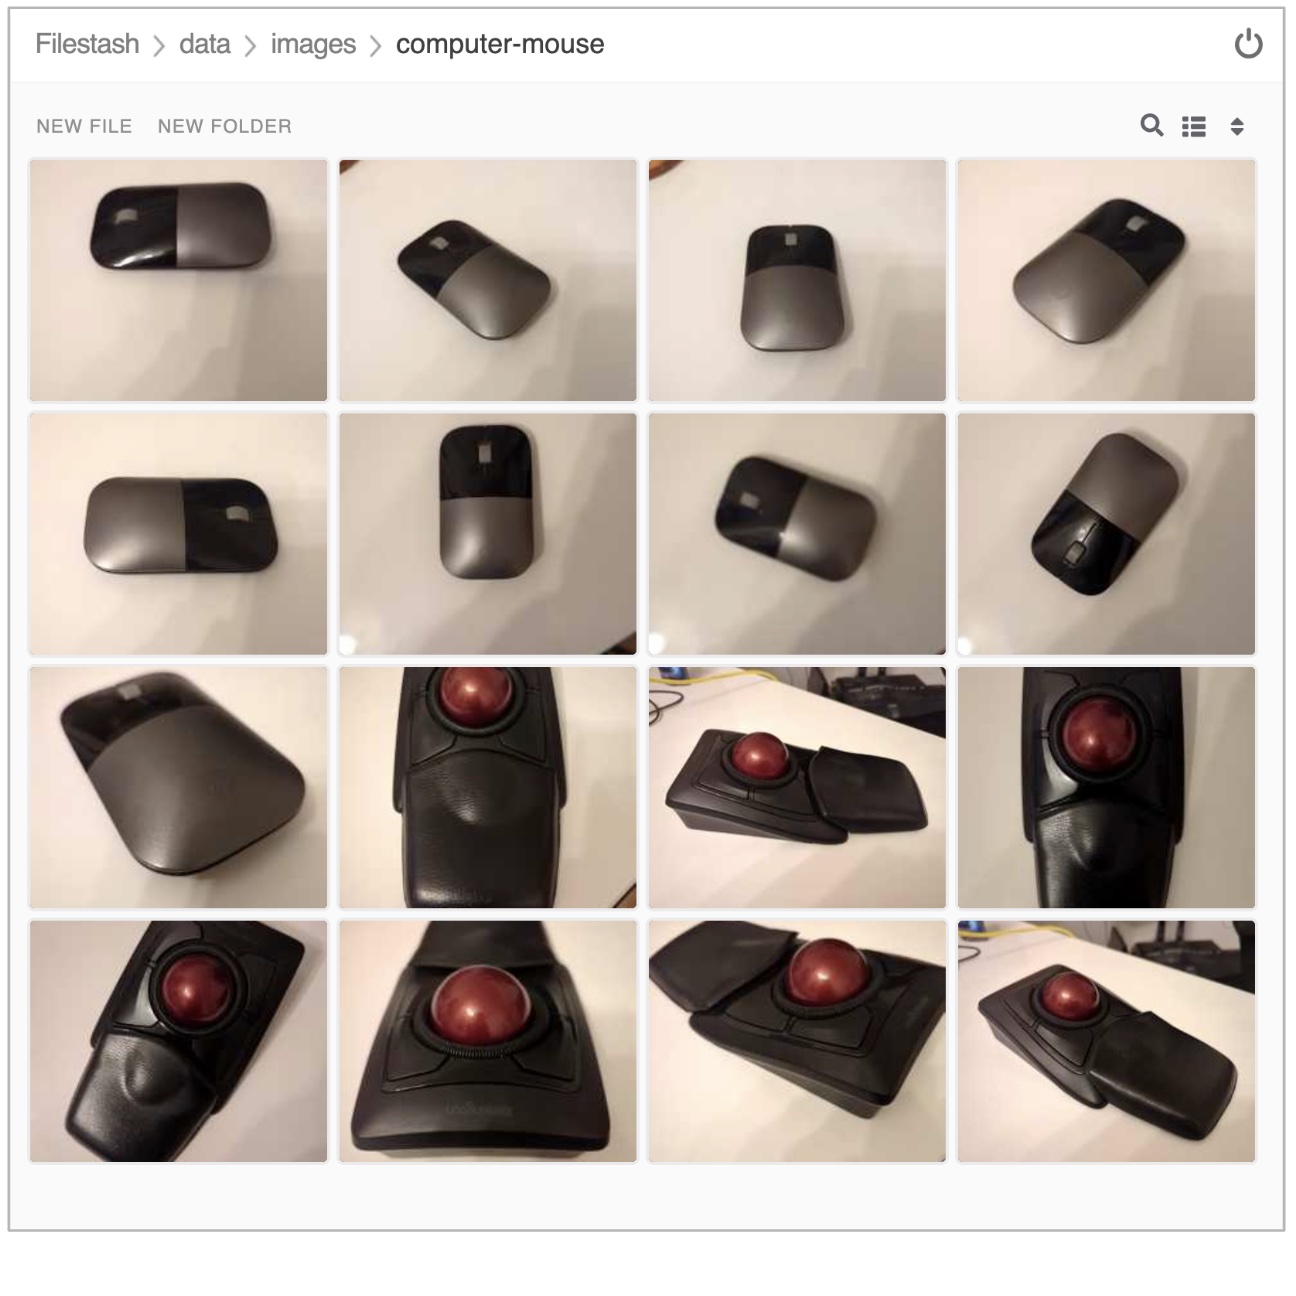
| Use the same S3 browser to visualise the data. |
4.4.4. Kick-off the training process
As you did earlier, from the administrative page, trigger the training process using the UI button.

Click Train Data.
Verify the pipeline is running and wait for its completion.
Use the command:
oc get pipelinerun -n tfYou should obtain something similar to:
NAME                    SUCCEEDED   REASON      STARTTIME   COMPLETIONTIME
train-model-run-ljrdk   True        Succeeded   6h23m       6h20m
train-model-run-lms4q   Unknown     Running     9s
where you can see the previous PipelineRun in status Succeeded, and the new one Running.
When the pipeline completes, go back to your App’s Detection Mode and try the new product out. If you trained your computer mouse, take a picture and send it.
You should obtain a price tag for your mouse:
Computer Mouse: 19.99 |
Well done! You have iterated the Product Catalogue to include new articles on offer.
